Home
- Boote - Boote
im Angebot - Bekleidung
- Zubehör - Segel
- Riggs - Wegbeschreibung
- Angebote
- Impressum/AGB - Kontakt
 J-24 NORTH SAILS Tuning Guide
| J-24 Tuning Guide for San Diego Design The tuning set up that follows is designed to be as "all purpose" as possible. Like many one designs the J/24 uses just a few sails to cover a wide range of wind and sea conditions. Set you boat up the way we have described here and you will have excellent speed in all conditions. |
|||||||||||||||||||||||||||||||||||||||||||||||||||||||||||||||||||||||||||||||||||||||
| . | |||||||||||||||||||||||||||||||||||||||||||||||||||||||||||||||||||||||||||||||||||||||
| Section 1. With the Mast Down 1) Measure the length of your spreaders from the surface of the mast to the point where the shrouds touch the end of the spreaders and make sure the spreaders are as short as possible, 760 mm. 2) Make sure the spreaders are swept back the same amount on each side.
3) Now check the deflection of the spreaders. This is the distance between the taut string between the spreaders and the aft side of the mast. For the San Diego model main this should be 160-165 mm. 4) If you mast has not been shortened before measure down the mast from the forestay fixing point as described in the class rule 3.5.2 (7725mm down from headstay pin center). You will need this mark later to find out if your mast can be shortened. You want your mast as short as possible. 5) We want the headstay as long as possible. To check this, attach the headstay and hold it alongside the front of the mast and make a mark on the headstay corresponding with the mark in Rule 3.5.2 (7725mm down from headstay pin center). |
|||||||||||||||||||||||||||||||||||||||||||||||||||||||||||||||||||||||||||||||||||||||
| . | |||||||||||||||||||||||||||||||||||||||||||||||||||||||||||||||||||||||||||||||||||||||
| Section
2. Mast Up Step the mast and attach all shrouds very loosely (except the backstay) leaving any mast blocks out for the moment. Temporarily hold the mast butt in place on the "I" beam with a pair of vise grip pliers. 1) Now is the time that you want to have a class measurer with an approved jig inspect your mast to make sure it is as short as possible. The mark you previously made on the mast must be no lower than 400mm above the sheerline abreast the mast. We like to cut our mast so the lower edge of the band is 405 mm above the sheerline to ensure that our mast will always measure in. See picture #2.
2) Next we need to make sure that the mast is positioned as far aft at deck level as possible. Have a friend hold the end of your tape at the stem measurement point and measure again straight to the lower edge to the mast band. We want this measurement to be as close to maximum as possible, 2925mm. Chock the mast at the deck to hold it in this position. See picture #3 for determining measurement point at stem.
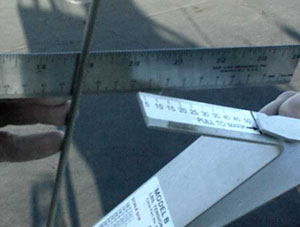
Hold the mast butt in place at this position temporarily with a pair of vise grips. 4) Now tighten the upper shrouds to 24 on a Loos Model B tension gauge and the lowers to 21. We get the uppers snug first and then using the genoa halyard measure down to the chainplates on both sides to be sure the mast is centered in the boat. Be sure to sight up the backside of the mast to be sure it is straight. 5) Now we
will check to make sure the mast butt is in the right place. With
the backstay disconnected measure the tension on the headstay. The
tip of your gauge should be about 20-30 mm from the close side of
the headstay wire. See picture #4 below.
At this point your mast should be set up with 1- 1.5" of prebend in the mast. To check this simply hold the main halyard at the gooseneck and sight up the backside of the mast. If this is not the case you will need to back and recheck your measurements. |
|||||||||||||||||||||||||||||||||||||||||||||||||||||||||||||||||||||||||||||||||||||||
| . | |||||||||||||||||||||||||||||||||||||||||||||||||||||||||||||||||||||||||||||||||||||||
| Section 3. Tuning Chart As we mentioned before, the J/24 has just 4 sails to cover the entire wind range the boat is raced in. For the best performance in each condition we adjust the tension on the shrouds depending on how much wind there is. As the final step in setting up your boat fill in the attached tuning chart with how many turns of the turnbuckles it take to get from one setting to another. We often adjust our shroud tensions between races (it is against class rules while racing) and it is impossible to the get accurate readings while the sails are up of the boat is in any waves at all.
Special note on the backstay: As you adjust the tension of your side shrouds up and down you will notice that the backstay gets tighter or looser. Each time you adjust your side shrouds be sure to adjust the two smaller backstay turnbuckles so that the blocks riding on the backstay bridles stay 6-8" below the "y' in the backstay when the tension is off. This is very important to make sure the headstay can get tight and loose enough depending on the conditions. You are now ready to start sailing! |
|||||||||||||||||||||||||||||||||||||||||||||||||||||||||||||||||||||||||||||||||||||||
| . | |||||||||||||||||||||||||||||||||||||||||||||||||||||||||||||||||||||||||||||||||||||||
| Sail Trim: Follow these guidelines to set up and trim your sails. Mainsail: Outhaul: 0-4 knots…clew
should be ½ " from black band Cunningham: Vang:
Traveler:
Backstay: Mainsheet:
Genoa set up: With the genoa there are three major things we are concerned with, having the lead in the proper position, having the genoa halyard set right and getting the sheet tension right. Halyard Tension: We want to the halyard set so the luff of the genoa has just a hint of wrinkles in it. The reason is that we have found that it is better to have the halyard too loose rather than too tight. In light air we want to be sure that the luff is nice and loose. As the wind builds, we tension the halyard enough that the cloth along the luff of the genoa is smooth. It is important to have a mark for your genoa halyard near the cleats or stopper that keep it in position. We mark off ½" increments to make it easier to duplicate fast settings. Lead Position: Note that it is important that you have drilled out an extra set of holes between each of the factory-drilled holes in your genoa track. The standard spacing is too far apart to be workable. Having the lead in the correct position is critical for good speed. In moderate breeze (4-8 knots), trim the sail in and position the lead car so that the sail touches the spreader and the chainplates or turnbuckles at exactly the same time. Mark this position. This will be your neutral point for your jib lead. Sheet Tension: We check the sheet tension by judging how many inches the sail is trimmed away from the end of the spreader. Generally we never trim the sail tighter than 1" from the end of the spreader.
As the above chart shows it is important to change your settings depending on the condition. Be aware that as the wind builds and dies you will need to be constantly adjusting the tension on the genoa sheet.
For fine tuning the lead position, drill two extra holes between each set of factory holes in the jib track. Start with the jib lead block positioned at the chainplates and fine tune the lead position from there. Unlike the genoa the luff of the jib should always be smooth. Be careful, you can in moderately heavy air get the luff too tight. The luff of the sail should break evenly up and down. If the sail breaks high first move the lead forward, low first move the lead back. Check this carefully and make a mark on the deck in the correct spot. Sheet tension is critical. We like to adjust the tension on the jib sheet to balance out the helm of the boat. If the boat has a bit of weather helm trim the jib slightly to pull the bow down. If the boat has leeward helm ease the jib slightly. Keep in mind that you only need to change the tension on the sheet very slightly (1/2" increments) to have a real effect on the trim of a high aspect sail like the jib.
The spinnaker should be at full hoist at all times. The general rule of trim is to allow 2-4" (50-102 mm) of curl in the luff of the sail. The outboard end of the pole should be even with the free floating clew and the pole should remain perpendicular to the apparent wind. Use the upper pole ring for most conditions. If you are going slow try raising the pole a couple of inches.
Downwind tips: 1. Pole height is important and changes in increments of 1" (25 mm) have a big effect on the spinnaker. The break the sail should curl evenly from top to bottom . If the spinnaker breaks high, the pole is too low and should be raised. If the break is low, the pole is too high and should be lowered. 2. Whether or not you use tweakers (or twings), an efficient foreguy system is crucial. Every up and down, or back and forth motion of the pole (and hence the spinnaker) is wasted energy; that energy will not be pulling the boat forward. 3. An efficient system for launching and retrieving the spinnaker is a must. We recommend a deep cockpit launching bag. Call us if you would like one made for your J/24. In conclusion: Always sail the boat as
flat as possible except for very light air
|
|||||||||||||||||||||||||||||||||||||||||||||||||||||||||||||||||||||||||||||||||||||||